Kinda. Not really. But kinda!
Check me out on my new blog: http://neverskipdessertbymackenzie.wordpress.com/
I will no longer be updating this blog so please check me out at the new site!
Wednesday, December 5, 2012
Friday, November 30, 2012
Hummus and Grilled Vegetable Pizza with Cauliflower Pizza Crust
Hummus and Grilled Vegetable Pizza with Cauliflower Pizza Crust
Serves: 1 pizza, for 2-3 people
Ingredients
- 2 c. cooked, riced cauliflower
- 4 egg whites
- 1.5 c. mozzarella cheese
- 2 tsp oregano
- 2 tsp. minced garlic
- 1 7oz. container of garlic roasted hummus
- 3/4 cup of extra virgin olive oil
- Salt and Pepper
- 3 vegetables (Zucchini, Squash, Green Peppers...), sliced 1/4 inch think
Instructions
- To rice the cauliflower: Buy a large head of cauliflower, wash it and pat dry. I used between 1/2 - 3/4 of it for 2 cups worth. Chop it into bite size pieces, and process in a rood processor until it is the size of rice.
- Place in a microwave safe dish and microwave for 7 minutes to cook.
- Preheat oven to 450 degrees.
- Take a pizza pan or cookie sheet and spray it liberally with non-stick cooking spray. It will be difficult to get off the pan so use a lot of spray and expect to have some trouble. You can use parchment paper as well. We used a silicone baking mat in our toaster oven because we don't have the small baking pan for it. It worked really well and didn't stick but probably wasn't able to cook as well...
- In a medium bowl, combine the cauliflower, egg white, mozzarella, oregano and garlic.
- Press mixture evenly in the pan. Push it down into all the corners making sure its stuck to itself pretty well. It will not be a perfect circle, but who cares :)
- Sprinkle with some parmesan cheese if you want some more flavor.
- Bake at 450 degrees for 12-15 minutes. I recommend checking it at about the 12 minute mark and then allow it too cook for remaining time if needed. This crust is not like a typical BREAD crust… it sometimes won’t stay together as well and will require a fork and a spoon, but I also know that once you taste it, you just won’t care. At all.
- While the crust is baking, scoop the garlic from the top of the hummus into a small bowl and stir in the 3/4 cup of olive oil. Season with salt and pepper. Transfer 3 tablespoons of the garlic oil to a large bowl. Add the vegetables and toss to coat. Whisk the hummus into the remaining garlic oil and season with salt and pepper.
- Working in 2 batches, grill the zucchini slices over high heat until they are lightly charred, about 5 minutes. Brush the zucchini lightly with some of the hummus and grill for 1 minute longer, turning once.
- When the crust is done, remove the pan from the oven. Spread hummus over the crust and top with vegetables.
- Return to oven and bake for 10 minutes or until hummus is bubbling.
- Enjoy! This requires a knife and fork fyi... it is definitely not "pick-up-able" pizza but it is certainly delicious and very healthy!
Cinnamon Quinoa Bake
This is perfect for breakfast or a midmorning snack. It's even better with jam spread over the top and a cup of coffee!

Photo from Gabby's Gluten-Free blog
Cinnamon Quinoa Bake
Recipe from

Makes 9-12 bars
Ingredients
2 1/2 cups cooked quinoa, cooled (1 cup dry)
4 eggs, beaten
1/3 cup vanilla soy milk
1/3 cup maple syrup
1 teaspoon vanilla extract
1 tablespoon cinnamon
4 eggs, beaten
1/3 cup vanilla soy milk
1/3 cup maple syrup
1 teaspoon vanilla extract
1 tablespoon cinnamon
Directions
1. Preheat the oven to 375ºF and place the cooked quinoa in a large mixing bowl. Line an 8-by-8-inch baking pan with lightly greased parchment.
2. In a small bowl, whisk together eggs, soy milk, vanilla extract, and cinnamon until thoroughly combined. Add maple syrup and whisk.
3. Add egg mixture to cooked and cooled quinoa. Stir with a large spoon to combine. Pour into the parchment-lined baking dish and spread it around to ensure that it’s even.
4. Bake for 20 to 25 minutes until set and golden.
5. Using parchment, remove bake from pan as soon as possible so that it doesn’t steam.
6. Cool completely and cut into squares. Delicious when warmed in the microwave and jam spread on top.
Thursday, November 8, 2012
Caramelized Onion and Spinach Olive Oil Quick Bread
Libby and I made Carrot-Thyme Soup and this bread for dinner tonight and both were great! The bread was extra delicious so I'm posting it, whereas the soup was a little too much carrot for me. It was great but I don't think I would make it again - so I won't post the recipe! (But you've got the link!)
The bread on the other hand was such a unique blend of flavors to have in a bread and I could have easily eaten the whole loaf!

Caramelized Onion and Spinach Olive Oil Quick Bread
Makes 1 loaf
Recipe from Cookin' Canuck
The bread on the other hand was such a unique blend of flavors to have in a bread and I could have easily eaten the whole loaf!

Photo from Cookin' Canuck
Makes 1 loaf
Recipe from Cookin' Canuck
3 tsp olive oil, divided
1 large yellow onion, cut in half through the root, and thinly sliced
1/2 tsp kosher salt
2 cups (packed) fresh spinach leaves
2 garlic cloves, minced
2 1/2 cups all-purpose flour
2 tsp baking powder
1/2 tsp salt
2 eggs, lightly beaten
3/4 cup 2% milk
2/3 cup extra-virgin olive oil
1 oz. crumbled myzithra (or feta) cheese
Butter and flour for pan
Preheat the oven to 350 degrees F.
Heat 2 teaspoons olive oil in a large skillet set over medium heat. Add the onion to the pan. Season with 1/2 teaspoon salt. Cook for 10 minutes, reduce the heat to medium-low, and cook until the onions are golden brown, about 10 additional minutes.
Add 1 teaspoon olive oil to the onions, then stir in garlic and spinach leaves. Stir until the spinach is wilted and bright green, about 1 minute. Remove from the heat.
In a medium bowl, whisk together flour, baking powder, and salt. In a large bowl, combine eggs, lightly beaten, milk, and extra-virgin olive oil. Whisk well until combined.
Pour the flour mixture into the eggs mixture and stir until just combined. Do not overmix or the bread will become tough. Add the spinach mixture and myzithra cheese, and stir until just combined.
Butter a loaf pan. Spoon 1 tablespoon flour into the pan and tap the flour around the pan. Shake out the excess. Scoop the batter into the pan and smooth the top.
Bake until the top is light golden brown and a wooden skewer inserted into the center comes out dry, 35 to 40 minutes. Cool in pan for 15 minutes, then remove the bread from the pan, and cool on a wire rack. Slice and serve.
Makes 1 loaf of bread.
Sunday, November 4, 2012
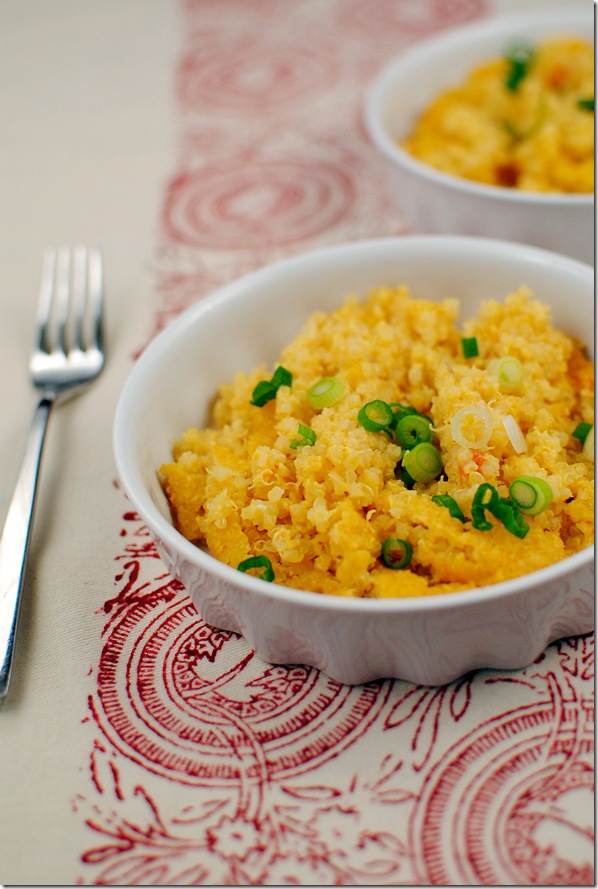
Quinoa Mac and Cheese
This was our yummy dinner tonight! Super easy, healthy and satisfied my craving for mac and cheese!
Quinoa Mac and Cheese
NOTE: Many readers wanted to know how many calories this AMAZING meal has. Divided into 6 servings: 339 Calories per serving.
Quinoa Mac and Cheese
Recipe adapted from Iowa Girl Eats
 Photo courtesy of Iowa Girl Eats
Servings
Serves 6-8
Ingredients
- 2 tsp olive oil
- 1 med. leek white and pale green parts halved and sliced (1 cup)-OR chives are fine too
- 1/2 cup diced tomato, or red/green pepper
- 1 1/2 cups quinoa, rinsed and drained (OR you can just use pre-cooked and cut back on the water and cooking time)
- good pinch of salt
- a few grinds of seasoning salt
- 2 cloves garlic, minced
- 3 cups of water (or stock)
- 2 large eggs
- 1 cup soy milk, non-fat milk, or milk of choice
- 1 1/2 cups grated Cheddar cheese, more for sprinkling- NOTE: (You may find you need more cheese, BUT I use this amount to still keep the dish ‘lighter’ yet very flavorful.)
- Optional- Crushed Red Pepper, Panko Bread crumbs for topping
- Toppings (optional)- salsa, hot sauce, sour cream, scallions (you get the picture)
Directions
- Heat oil in med. saucepan over med. heat. Add leek and tomatoes (or bell peppers-or any veggies you want really); cover and cook 5 mins or until tender. Stir in quinoa and garlic, and cook, uncovered, 3-4 mins, or until grains start to turn opaque. (They will not fully be cooked yet.)
- Add 3 cups water (or stock) and season with salt and the Seasoning Salt (I like Lawry’s or Everyday Seasoning). Cover and reduce heat to med-low and simmer 15-20 mins or more, (depends and also what kind of quinoa you use) or until most liquid has been absorbed. Remove from heat and let stand 5 mins.
- Preheat oven to 350 F. Coat 13×9 inch dish with cooking spray. Whisk together eggs and milk in large bowl. Fold in quinoa mixture and cheese (if you feel you need more cheese, add here.) Stir very well and let some of the cheese melt. (Will seem a little “soupy,” do not worry, it will all mold together.)
- Transfer to prepared baking dish and if using Panko crumbs or Bread crumbs, add now. You can also sprinkle a bit more cheese on now if you prefer for topping. Bake 25-35 mins, (or until browned around edges.)
- Now you can toss with many toppings, some ideas: salsa, scallions, sour cream, and hot sauce! I serve with a side of steamed broccoli or a salad and a nice slice of good hearty bread.
Roasted Acorn Squash with Wild Rice Stuffing
Libby got some acorn squash a few weeks ago and we've been wanting to make something with them. She found this recipe and so we tried it on Friday night and it was so good! It's a perfect fall meal!

Roasted Acorn Squash with Wild Rice Stuffing
Makes 6 servings
Recipe from chow


Roasted Acorn Squash with Wild Rice Stuffing
Makes 6 servings
Recipe from chow
The wild rice mixture can be made up to 2 days ahead; keep it refrigerated in an airtight container.
You can make the stuffing up to 6 hours ahead; keep it covered in the refrigerator.
You can make the stuffing up to 6 hours ahead; keep it covered in the refrigerator.
INGREDIENTS
- 3 medium acorn squash (about 1 1/2 pounds each), halved lengthwise and seeds removed
- 3 tablespoons unsalted butter, melted
- 1 tablespoon packed dark brown sugar
- 1/2 medium yellow onion, finely chopped
- 2 medium shallots, finely chopped
- 4 celery stalks, finely chopped
- 1 tablespoon minced fresh thyme leaves
- 2 cups cooked wild rice mix
- 2/3 cup pecans, toasted and finely chopped
- 1/4 cup dried cranberries, finely chopped
- 1 teaspoon kosher salt, plus more as needed
- 1/2 teaspoon freshly ground black pepper, plus more as needed

INSTRUCTIONS
- Heat the oven to 450°F and arrange a rack in the middle.
- Place the squash cut-side up on a baking sheet, brush 1 tablespoon of the melted butter over the tops and insides of the squash halves, sprinkle with the brown sugar, and season with salt and pepper. Roast in the oven until just fork tender, about 25 to 30 minutes.
- Meanwhile, place 1 tablespoon of the melted butter in a large frying pan over medium heat. When it foams, add the onion, shallots, and celery, season with salt and pepper, and stir to coat. Cook, stirring occasionally, until just softened, about 6 minutes. Stir in the thyme and cook until just fragrant, about 1 minute.
- Remove from the heat and stir in the rice, pecans, cranberries, and measured salt and pepper.
- Divide the rice filling among the roasted squash halves (about 1/2 cup for each) and drizzle the remaining tablespoon of butter over top. Continue roasting until the squash is completely fork tender, the edges have started to brown, and the filling is heated through, about 20 to 25 minutes.
Saturday, November 3, 2012
Maple Cinnamon Applesauce
I love applesauce. Love it, love it, love it. But what I love even more is homemade, warm applesauce.

I remember every year at our Christmas dinner, Grandma Olga would make her homemade applesauce - and it was always my favorite part of the meal. And ever since, I have loved warm, homemade applesauce. I've rarely had it ouside of our family Christmas meals but the other day I came across a recipe for homemade maple cinnamon applesauce and immediately knew I was making it asap.
Well, thanks to our new induction burner, it is so easy to make something like this now! I just started it boiling in the corner of the room (on the floor - next to the outlet haha) and settled in and got some homework done... all without leaving the suite! When it was finished, I hesitatingly took a bite, not expecting it to rival Grandma Olga's... but I think I found a competitor! It was FANTASTIC. The flavor was delicious and it tasted exactly like what I remember Grandma's tasting like when I was little... I was thrilled to say the least!
I made it as an appetizer for our Halloween party and it was the first thing that was gone! Everyone loved it and was so impressed that it was homemade!
So... after building it up so much - here is the recipe!
(Photo courtesy of Eating Well)
Maple Cinnamon Applesauce
Makes about 3 1/2 cups
Recipe from Eating Well
- 6 McIntosh or other tart apples, peeled and cut into 1-inch pieces
- 2 Golden Delicious or other sweet apple, peeled and cut into 1-inch pieces
- 1/4 cup water
- 2 tablespoons pure maple syrup
- 1/2 teaspoon ground cinnamon
Thursday, November 1, 2012
Libby's Cranberry Pecan Muffins
These are the muffins Libby made for our breakfast with our families. They were fantastic!!!

Libby's Cranberry Pecan Muffins

Libby's Cranberry Pecan Muffins
Makes 12 muffins
If fresh cranberries aren't available, substitute frozen: Microwave them in a bowl until they're partially but not fully thawed, 30 to 45 seconds.
INGREDIENTS
STREUSEL TOPPING
- 3 tablespoons all-purpose flour
- 4 teaspoons granulated sugar
- 1 tablespoon packed light brown sugar
- 2 tablespoons unsalted butter , cut into 1/2-inch pieces, softened
- Pinch salt
- 1/2 cup pecan halves
MUFFINS
- 1 1/3 cups all-purpose flour
- 1 1/2 teaspoons baking powder
- 1 teaspoon salt
- 1 1/4 cups pecan halves, toasted and cooled
- 1 cup plus 1 tablespoon granulated sugar
- 2 large eggs
- 6 tablespoons unsalted butter, melted and cooled slightly
- 1/2 cup whole milk
- 2 cups fresh cranberries
- 1 tablespoon confectioners' sugar
INSTRUCTIONS
- 1. FOR THE STREUSEL: Adjust oven rack to upper-middle position and heat oven to 425 degrees. Process flour, granulated sugar, brown sugar, butter, and salt in food processor until mixture resembles coarse sand, 4 to 5 pulses. Add pecans and process until pecans are coarsely chopped, about 4 pulses. Transfer to small bowl; set aside.
- 2. FOR THE MUFFINS: Spray 12-cup muffin tin with baking spray with flour. Whisk flour, baking powder, ¾ teaspoon salt together in bowl; set aside.
- 3. Process toasted pecans and granulated sugar until mixture resembles coarse sand, 10 to 15 seconds. Transfer to large bowl and whisk in eggs, butter, and milk until combined. Whisk flour mixture into egg mixture until just moistened and no streaks of flour remain. Set batter aside 30 minutes to thicken.
- 4. Pulse cranberries, remaining ¼ teaspoon salt, and confectioners’ sugar in food processor until very coarsely chopped, 4 to 5 pulses. Using rubber spatula, fold cranberries into batter. Use ice cream scoop or large spoon to divide batter equally among prepared muffin cups, slightly mounding in middle. Evenly sprinkle streusel topping over muffins, gently pressing into batter to adhere. Bake until muffin tops are golden and just firm, 17 to 18 minutes, rotating muffin tin from front to back halfway through baking time. Cool muffins in muffin tin on wire rack, 10 minutes. Remove muffins from tin and cool for at least 10 minutes before serving.
TECHNIQUE
- RAMPING UP NUTTINESS, TONING DOWN TANG
 MAKE NUT FLOUR Instead of chopped nuts, we incorporate homemade toasted pecan “flour” into the batter, which lends the muffins richer, heartier flavor.
  CHOP CRANBERRIES WITH SUGAR—AND SALT Processing the berries with confectioners’ sugar sweetens them; a dash of salt masks their bitter edge.
 TOP WITH STREUSEL A classic nut streusel sprinkled over the top of the muffins adds rich buttery crunch and just a hint of sweetness.
TECHNIQUE
- THICKENING THIN BATTERWe thought a lack of gluten was causing our nut flour-base muffin batter to be thin and runny, leading to muffins that baked up flat. But when we accidentally let the batter rest briefly—a fluke occurrence when we walked away for 30 minutes—the batter thickened and the muffins baked up nice and tall. Could the rest be what improved the muffins' structure? We prepared another batch, this time deliberately letting the batter rest for 30 minutes before baking, and compared the results with muffins we baked right away. Once again, the rested batter thickened considerably and produced muffins with nicely domed tops, while the unrested batter was thin and created predictably flat muffins that spread across the tin.After a chat with our science editor, we understood why: As batter rests, a small amount of gluten develops, providing structure. But the main effect is that water more fully hydrates the starches, causeing them to swell. This swelling thickens the batter and helps prevent it from spreading during baking.
Libby's Sugar Cookies
Libby and I hosted a little Halloween Party the other night for our friends. We had so much fun cooking and baking and then having everyone over to decorate cookies, carve pumpkins and just hang out!
We used Libby's family's sugar cookie recipe and WOAH, were they were good! They stayed perfectly soft after coming out of the oven and tasted fantastic! So here's the recipe for all those Christmas cookie baking that is going to be coming up!


Libby's Sugar Cookies
Ingredients:
1 1/2 cups butter
2 cups white sugar
4 eggs
1 tsp. vanilla
5 cups flour
2 tsp. baking powder
1 tsp. salt
Directions:
1. Cream together butter and sugar. Add eggs and vanilla. Mix well.
2. Add flour, baking powder and salt. Mix well. Cover and chill dough for at least an hour (or overnight).
3. Preheat oven to 400 degrees.
4. Roll out dough on floured surface to 1/4-1/2 inch thick. Cut with cookie cutters. Bake 6-10 minutes on ungreased pan. Cool completely.
Wednesday, October 31, 2012
Chocolate, Raspberry, Walnut Breakfast Quinoa
Libby bought an induction stove for our suite this weekend :D It is so great! We can make so many things now - including basically every kind of meal! Now that we have a world of opportunities... I returned to some of the pinterest recipes that I had thought I'd need to "save for later" (when I had access to a stove). This was the first thing I decided to try! I had made a similar dish this summer, except with strawberries and almonds I think but this one looked great too! And it turned out really great!!!

Chocolate, Raspberry, Walnut Breakfast Quinoa
Serves 1 (easily doubled)
Recipe adapted from Once Upon A Cutting Board
1/2 cup vanilla almond milk (or unsweetened milk + sweetener of choice)
1/4 cup quinoa, rinsed
1/2 cup raspberries
2 Tablespoons chopped walnuts
1 Tablespoon chocolate chips
Bring milk to a boil in a small saucepan. Add quinoa, cover, reduce to a low simmer and cook for 15 minutes.
Meanwhile, toast almonds in a dry skillet over medium heat until golden brown and fragrant - should only take a few minutes.
Remove quinoa from heat, keep covered, and let sit for 5 minutes, until milk is absorbed. If using unsweetened milk, you may wish to add a bit of sweetener at this point (to taste, you could use honey, agave nectar or brown sugar), then recover and let sit 5 minutes.
Add raspberries, almonds, and chocoalte chips to the quinoa, stir and serve warm!
Substitutions:
The original recipe called for cherries instead of raspberries and almonds instead of walnuts. I used raspberries and walnuts because I had them and they sounded good :) Any fruit or nut would work great in this!

Photo Curtesy of Once Upon a Cutting Board - This is made with cherries and almonds.
Chocolate, Raspberry, Walnut Breakfast Quinoa
Serves 1 (easily doubled)
Recipe adapted from Once Upon A Cutting Board
1/2 cup vanilla almond milk (or unsweetened milk + sweetener of choice)
1/4 cup quinoa, rinsed
1/2 cup raspberries
2 Tablespoons chopped walnuts
1 Tablespoon chocolate chips
Bring milk to a boil in a small saucepan. Add quinoa, cover, reduce to a low simmer and cook for 15 minutes.
Meanwhile, toast almonds in a dry skillet over medium heat until golden brown and fragrant - should only take a few minutes.
Remove quinoa from heat, keep covered, and let sit for 5 minutes, until milk is absorbed. If using unsweetened milk, you may wish to add a bit of sweetener at this point (to taste, you could use honey, agave nectar or brown sugar), then recover and let sit 5 minutes.
Add raspberries, almonds, and chocoalte chips to the quinoa, stir and serve warm!
Substitutions:
The original recipe called for cherries instead of raspberries and almonds instead of walnuts. I used raspberries and walnuts because I had them and they sounded good :) Any fruit or nut would work great in this!
Sunday, October 21, 2012
Pumpkin Chocolate Chip Cookies
The latest treat in our suite!

Photo courtesy of Vintage Dutch Girl
Recipe adapted from Vintage Dutch Girl
Ingredients:
1 cup canned pumpkin
1 cup white sugar
1/2 cup vegetable oil
1 egg
1 cup all-purpose flour
1 cup whole wheat flour
2 teaspoons ground cinnamon
1/2 teaspoon salt
1 teaspoon baking soda
1 teaspoon milk
1 tablespoon vanilla extract
3 cups semisweet chocolate chips
Directions:
1. Combine pumpkin, sugar, vegetable oil and egg. In a separate bowl, stir together flour, baking powder, ground cinnamon and salt. Dissolve the baking soda with the milk and stir in. Add flour mixture to pupmking mixture and mix well.
2. Add vanilla and chocolate chips and lightly stir until combined.
3. Drop by spoonful on greased cookie sheet and bake at 350 degrees for approximately 10 minutes or until lightly brown.
Sunday, October 14, 2012
Whole Grain Pumpkin Pancakes with Apple Maple Compote
Well this was a dinner straight from Heaven. And it must be Fall up in Heaven because this meal was full of fall's favorite flavors.
Libby and I had a blast getting creative with this recipe. The pancakes were easy since we could mix everything in the room and cook them on the griddle in our room. The compote however, was a different story. The nearest stove top is in the basement of the building next door - down 3 flights of stairs out the main door, into the building next door, down a flight of stairs and into their "kitchen", all the while praying that nobody is using it. Libby and I have grown tired of running up and down those stairs so we had a brainstorm idea! Can we put the pot on top of the griddle and see if it will conduct enough heat to cook the apples and warm the compote?
Well, guess what? It worked fabulously!!! And it didn't just warm the apples and the compote, it actually got the compote almost boiling! A WORLD of possibilities has been opened to us!! Imagine what we can do with a "stove" in our room :D
Anyways, back to the recipe :) The pancakes have a delicious, savory pumpkin flavor but topped with the apple maple compote, you've got a fantastic combination of fall flavors. I highly recommend making this for a weekend breakfast or dinner sometime soon! I know we'll be making it again very soon!

Whole Grain Pumpkin Pancakes with Apple Maple Compote
Libby and I had a blast getting creative with this recipe. The pancakes were easy since we could mix everything in the room and cook them on the griddle in our room. The compote however, was a different story. The nearest stove top is in the basement of the building next door - down 3 flights of stairs out the main door, into the building next door, down a flight of stairs and into their "kitchen", all the while praying that nobody is using it. Libby and I have grown tired of running up and down those stairs so we had a brainstorm idea! Can we put the pot on top of the griddle and see if it will conduct enough heat to cook the apples and warm the compote?
Well, guess what? It worked fabulously!!! And it didn't just warm the apples and the compote, it actually got the compote almost boiling! A WORLD of possibilities has been opened to us!! Imagine what we can do with a "stove" in our room :D
Anyways, back to the recipe :) The pancakes have a delicious, savory pumpkin flavor but topped with the apple maple compote, you've got a fantastic combination of fall flavors. I highly recommend making this for a weekend breakfast or dinner sometime soon! I know we'll be making it again very soon!

(Photo courtesy of Honey and Jam)
Whole Grain Pumpkin Pancakes with Apple Maple Compote
Recipe from Honey and Jam
Whole Grain Pumpkin Pancakes
2 cups whole wheat pastry flour
1 tsp baking powder
1/2 tsp. baking soda
1/3 cup sugar
1/2 tsp. sea salt
1 tbsp. pumpkin pie spice
1 1/4 cups organic buttermilk
1 cup pumpkin puree
2 large eggs, lightly beaten
2 tbsp. butter, melted
butter, to serve and for pan
To make the pancakes, combine the flour, baking powder, baking soda, sugar, spice and salt in a large bowl. Add the buttermilk, pumpkin, eggs and melted butter. Stir all the ingredients until they are just blended. Don't worry if the batter is a bit lumpy, you don't want to over mix.
Heat your skillet, pan or griddle to medium hot and brush it was a bit of butter. Test for the right temperature by dropping a drip of water onto the surface of the pan. If the starts to dance, you are in the ballpark. Pour 1/3 cup of batter into the skillet, wait until the pancake is golden in color, then flip with a spatula and cook the other side until golden and cooked through. Repeat with remaining batter. Serve with Apple Maple Compote. Makes about 12 large pancakes
Apple Maple Compote
1/2 an apple per person (roughly), cut into slices
Pat of butter
Cinnamon
Maple Syrup
Add a pat of butter to a medium sized pan, enough to cover the entire thing. Next, add the apples to the pan and sprinkle the cinnamon over. Let the apples get soft, turning them over once, and sprinkle the other side with cinnamon. Add enough maple syrup to cover the apples. Let it bubble away for a minute or so. Pour over warm pancakes.
Ser
Wednesday, October 10, 2012
Pumpkin Coffee Cake with Brown Sugar Glaze
It's fall and that means pumpkin! I bought 4 cans of pumpkin at the store a few weeks back and have been itching to make something with them! The golf team requested this coffee cake and so I made it for practice one day last week and it was delicious!!

Pumpkin Coffee Cake with Brown Sugar Glaze
Recipe adapted from Six Sisters' Stuff
Makes one 9x13
Ingredients:
1/3 cup water
1 (15 oz) can pureed pumpkin (not pie filling!)
2 eggs
1 tablespoon vanilla
2 teaspoons pumpkin pi spice
1 (18 oz) box yellow cake mix
1 teaspoon baking soda
1/2 cup brown sugar
1/2 cup all purpose flour
4 tablespoon butter, melted
Prehead oven to 350. In a large bowl, mix water, pumpkin, eggs, vanilla and pumpkin pie spice. Mix in cake mix (just the dry mix not the other ingredients it calls for) and baking soda and mix until combined. Pour batter into a greased 9x13 baking pan. In a small bowl, mix together brown sugar, flour and melted butter. Sprinkle over the top of the cake. Bake for 25-30 minutes or until an inserted toothpick comes out clean. Serve your cake when warm or cooled to room temperature.

(Photo courtesy of Six Sisters' Stuff)
Pumpkin Coffee Cake with Brown Sugar Glaze
Recipe adapted from Six Sisters' Stuff
Makes one 9x13
Ingredients:
1/3 cup water
1 (15 oz) can pureed pumpkin (not pie filling!)
2 eggs
1 tablespoon vanilla
2 teaspoons pumpkin pi spice
1 (18 oz) box yellow cake mix
1 teaspoon baking soda
1/2 cup brown sugar
1/2 cup all purpose flour
4 tablespoon butter, melted
Prehead oven to 350. In a large bowl, mix water, pumpkin, eggs, vanilla and pumpkin pie spice. Mix in cake mix (just the dry mix not the other ingredients it calls for) and baking soda and mix until combined. Pour batter into a greased 9x13 baking pan. In a small bowl, mix together brown sugar, flour and melted butter. Sprinkle over the top of the cake. Bake for 25-30 minutes or until an inserted toothpick comes out clean. Serve your cake when warm or cooled to room temperature.
Sweet Potato Biscuits
I saw this recipe on pinterest a week or so ago and thought they looked delicious! Plus, I have a weird love of sweet potatoes so that made me even more excited about them :)
I was thinking of trying these out at Thanskgiving, but when Libby and I were at Trader Joe's yesterday we decided to make dinner for ourselves and so I suggested we try these out! And they were fantastic!!! We'll definitely be making these at Thanksgiving!

Sweet Potato Biscuits:
Recipe adapted from Cookmee
Makes 6 good sized biscuits
1 cup whole wheat flour
3/4 cup all-purpose flour
2 tablespoons brown sugar
2 1/2 teaspoons baking powder
1 tsp. salt
1/2 tsp baking soda
6 tablespoons chilled unsalted butter, cut into pieces, plus 1/2 tablespoon melted butter and more for pan
3/4 cup Sweet Potato Puree (see below), chilled
1/3 cup buttermilk
1. Make the dough: In a large bowl, whisk together flour, sugar, baking powder, salt and baking soda. With a pastry blender or two knives, cut in utter until mixture resembles coarse meal, with some pea-sized lumps of butter (I blended in food processor). In a small bowl, whisk together sweet potato puree and buttermilk; stir quickly into flour mixture until combined (do not overmix).
2. Shape the biscuits: Turn out dough onto a lightly florued surface, and knead very gently until dough comes together but is still slightly lumpy, five or six times. (If dough is too sticky, work in up to 1/4 cup additional flour). Shape into a disk and pat to an even 1-inch thickness. With a floured 2-inch biscuit cutter (or cup!), cut out biscuits as close together as possible. Gather together scraps and repeat to cut out more biscuits.
3. Bake the biscuites: Preheat oven to 425 degrees with rack on lower shelf. Butter an 8-inch cake pan. Arrange biscuits in pan (to help them stay upright). Brush with melted butter. Bake until golden, rotating once, 20-24 minutes.
Sweet Potato Puree
Recipe from marthastewart.com
Serves 4 (makes probably 4x what you need for the sweet potatoes but they are yummy to snack on!)
3 large sweet potatoes
2 tablespoons melted butter
2 tablespoons maple syrup
1. Peel and cut 3 large sweet potatoes into 2-inch chunks. In a large saucepan, cover potatoes with water. Bring to a boil; cook until tender when pierced with the tip of a paring knife, 15 to 20 minutes. Drain; puree in a food processor, with butter and syrup. Season with salt and pepper.
I was thinking of trying these out at Thanskgiving, but when Libby and I were at Trader Joe's yesterday we decided to make dinner for ourselves and so I suggested we try these out! And they were fantastic!!! We'll definitely be making these at Thanksgiving!

(Photo curtesy of cookme)
Recipe adapted from Cookmee
Makes 6 good sized biscuits
1 cup whole wheat flour
3/4 cup all-purpose flour
2 tablespoons brown sugar
2 1/2 teaspoons baking powder
1 tsp. salt
1/2 tsp baking soda
6 tablespoons chilled unsalted butter, cut into pieces, plus 1/2 tablespoon melted butter and more for pan
3/4 cup Sweet Potato Puree (see below), chilled
1/3 cup buttermilk
1. Make the dough: In a large bowl, whisk together flour, sugar, baking powder, salt and baking soda. With a pastry blender or two knives, cut in utter until mixture resembles coarse meal, with some pea-sized lumps of butter (I blended in food processor). In a small bowl, whisk together sweet potato puree and buttermilk; stir quickly into flour mixture until combined (do not overmix).
2. Shape the biscuits: Turn out dough onto a lightly florued surface, and knead very gently until dough comes together but is still slightly lumpy, five or six times. (If dough is too sticky, work in up to 1/4 cup additional flour). Shape into a disk and pat to an even 1-inch thickness. With a floured 2-inch biscuit cutter (or cup!), cut out biscuits as close together as possible. Gather together scraps and repeat to cut out more biscuits.
3. Bake the biscuites: Preheat oven to 425 degrees with rack on lower shelf. Butter an 8-inch cake pan. Arrange biscuits in pan (to help them stay upright). Brush with melted butter. Bake until golden, rotating once, 20-24 minutes.
Recipe from marthastewart.com
Serves 4 (makes probably 4x what you need for the sweet potatoes but they are yummy to snack on!)
3 large sweet potatoes
2 tablespoons melted butter
2 tablespoons maple syrup
1. Peel and cut 3 large sweet potatoes into 2-inch chunks. In a large saucepan, cover potatoes with water. Bring to a boil; cook until tender when pierced with the tip of a paring knife, 15 to 20 minutes. Drain; puree in a food processor, with butter and syrup. Season with salt and pepper.
Friday, September 21, 2012
'Blown Away' Blueberry Muffins
I saw the recipe for these on pinterest earlier this week and have been CRAVING them ever since. I was actually in a really bad mood on Tuesday because I knew I wouldn't have any time to bake them until Friday (today!).

Well, with my calculus exam behind me and a fun weekend ahead of me - I figured it was time to make these :) And they more than fulfiled my expectations!!
Definitely give these a shot for breakfast some morning - you won't be disappointed!

Blueberry Muffins
Recipe Adapted from Gourmet
Makes 12 Muffins (seriously! It makes an even dozen! when does a recipe ever make an even dozen???)
For Muffins:
1 cup All purpose flour
3/4 cup whole wheat pastry flour
1/2 cup sugar
2 tsp. baking powder
3/4 tsp. salt
1 tsp. grated lemon zest
1 large egg
1/2 cup nonfat milk
5 Tbsp. unsalted butter, melted
1 1/2 cups frozen blueberries (about 7 ounces)
For topping:
1 tsp. turbinado sugar
1/4 tsp. cinnamon
-Preheat oven to 375 degrees. Butter muffin pan or use paper liners.
-Whisk together flour, sugar, baking powder, and salt in a large bowl, then whisk in zest.
-Whisk egg in another bowl, then whisk in milk and butter. Add to dry ingredients and stir with a rubber spatula until just combined (batter will be dense). Fold in blueberries. Divide batter amount muffin cups.
-Stir together sugar and cinnamon and sprinkle evenly over batter in cups.
- Bake until a wooden pick inserted into center of muffins comes out clean, about 20 minutes. Serve at warm or room temp.
Monday, September 3, 2012
Pumpkin Pie Dip
This dip is REALLY good! And it's healthy too! I whipped this up last night in our suite (so easy too because it doesn't require any cooking and so I can do the whole thing in my room!) and now it is going to be a great little treat to have in the fridge all week. Eat it with apples, pita bread, carrots, crackers... anything!

Pumpkin Pie Dip
Recipe from Six Sisters' Stuff
Makes about 6 cups (12 servings). Mine made two of the tupperwares in the picture above.
Ingredients:
15 oz can pumpkin
3/4 cup brown sugar
1 tsp vanilla
1/8 tsp. cinnamon
1/8 tsp. pumpkin pie spice
6 oz. fat free Greek yogurt
8 oz. Cool Whip (fat-free)
apples, bananas, crackers, cookies...
Mix pumpkin with brown sugar, vanilla and spices, blend well. Mix in yogurt. Fold in coolwhip and chill in refrigerator until ready to eat.
Saturday, September 1, 2012
Snickerdoodle Cake!
This cake was awesome! It was our first baking attempt of the year - it's definitely going to be interesting with no easily accessible kitchen! We made up the batter in our room and then ran it down to the kitchen next door to bake it... worked just fine! I see a lot of "no bake" items in our future though!
Okay so this Snickerdoodle cake is from pinterest and the picture looked incredible! So when we were trying to figure out what to make - I kept returning to that recipe and... well pretty soon it was in progress!
Ours wasn't nearly as pretty as the one in the original link - but it sure tasted fantastic!!!

Snickerdoodle Cake
Makes 1 9/13 or 2 round cakes (to layer)
Recipe from foodwithfamily
For the cake:
1 1/2 cups all-purpose flour
1 1/2 cups cake flour (we substituted with 1 1/3 cups AP flour and 1/4 cup cornstarch)
1 Tbs baking powder
1/2 tsp. salt
1 Tbs. ground cinnamon
2 sticks butter, softened to room temp.
1 3/4 cups fine or superfine sugar (we just used regular)
4 large eggs, room temp.
1 Tbs. vanilla extract
1 1/4 cups whole milk, warmed to room temp.
For the buttercream: (we made this up because we didn't have enough butter but it was still really good so i'll share it with you. Find the directions to the original recipe in the link above)
1 stick of butter
2 cups powdered sugar
1/4 cup of brown sugar
1/2 Tbs ground cinnamon
1/2 cup milk
These are REALLY rough estimates. We really just eyeballed it until it tasted/looked good :)
To Bake the Cake:
Preheat the oven to 235. Butter and flour your pan(s) (tip is to use the butter wrappers from the butter you're about to use!)
In a mixing bowl, whisk together the flours, baking powder, salt and cinnamon. Set aside.
Cream together the butter and sugar until fluffy and pale in color.
Beat the eggs in one at a time, fully incorporating each egg and scraping down the bowl in between each addition. Beat in vanilla.
Add about 1/3 of the milk, beat to incorporate, then 1/3 of the flour mixture, again beating to incorporate.
Repeat this process, scraping down the bowl as necessary, until all of the milk and flour are mixed in evenly - starting and ending with the dry ingredients.
Pour the batter into the bans and bake, rotating midway through, for about 35 minutes (we did 40) or until it tests done.
Let the cakes cool in the pan on a rack for 5 minutes before turning onto the racks to finish cooling.
To Make the Buttercream:
Beat together butter, brown sugar and cinnamon until fluffy. Add the powdered sugar and vanilla and beat. Add milk to desired consistency.
Frost and you're good to go!
Sunday, July 29, 2012
Blueberry Chocolate Chip Frozen Yogurt
I've made several batches of ice cream this summer with my new Kitchenaid Ice Cream Maker :) And it's been awesome! Molly Moon's Ice Cream is my favorite ice creamery in the Seattle area and they came out with a cookbook this year. It's got some fantastic recipes in it and I have love recreating them! I'm not going to give out the recipes in the book because I want to support this local business and make you buy the book!

However, I tried a frozen yogurt recipe from pinterest last week and it was great! So here it is!

Blueberry Chocolate Chip Frozen Yogurt
Recipe adapted from Simply Recipes
Makes about 1 quart
3 cups fresh or frozen blueberries (I used fresh)
3 Tbsp lemon juice
3/4 cup to 1 cup sugar (depending on how sweet your blueberries are, and how sweet you want the result to be) - I did 3/4 cups because my blueberries were fresh and sweet!
1/4 teaspoon salt
1/8 teaspoon cinnamon
1 1/2 cups full fat plain yogurt (full fat yogurt is preferred, if you are use low-fat or non-fat yogurt, substitute 1/4 cup of it with heavy whipping cream - which is what I did)
1/2 cup whole milk
3/4 cup mini chocolate chips
1. Place the blueberries, lemon juice, sugar, salt and cinnamon in a medium saucepan. Heat on medium heat, stirring, until all of the sugar has dissolved. While the mixture is heating, use a potato masher to mash up the blueberries. When all of the sugar has dissolved, remove from heat and let cool for 10 minutes.
2. Stir in the yogurt and milk until completely incorporated. Chill the mixture in the refrigerator for several hours (or overnight) until completely cold.
3. Process the blueberry yogurt mixture in your ice cream maker according to manufacturer's instructions (usually about 25 minutes). In the last 5 minutes, add the chocolate chips. Let firm up a bit by freezing it for several hours.
Subscribe to:
Posts (Atom)